Showing posts with label working for it. Show all posts

May 7, 2012

Orchids and Portraits


I photographed these orchids the same day I photographed the mums in the previous post. I was having a blast with the lighting! I have decided my room has the best light in our house. It has the least reflection off (orange and red!) roofs next door, and provides the whitest light. I also had fun photographing my sister in the same room a few days ago... and got some nice results!


It is so fun to discover great places to take photos....I've always had a hard time with indoor lighting, and it was great to find a place with good light! 

Apr 17, 2012

Thoughts on Editing


I've been working alot in Lightroom this week, trying to get more familiar with it, and developing a workflow. I have also selected a few photos and worked for a long time on them, trying to find good editing style for me.


I like photos that have bright, vibrant colors. Having a photo completely in focus is a must for me, and I really try not to crop off limbs. I want my photos to look real, not all hazy and dreamy, but also not over-edited.

I really admire photographers who do not edit. For one thing, they don't have to spend nearly as much time processing, and they also can spend more time learning how to use their camera to the best of their ability.
It is my goal to get everything right in camera....white balance, focus, cropping, and other things, like making sure there is nothing I don't want in the photo. 

Look at the photo below... 
In the before version, you can see the tip of a red scooter handle right next to his head. I really didn't notice that when I was shooting the photo, but when I went in to edit, it bothered me. I tried to edit it out, but it kind of failed (as you can see :P). I want to notice those kinds of things, and fix them before I take the photo.


Anyway, that was a little bit rambling and I don't know if you got anything out of it. 
Oh well. Enjoy the photos!

Apr 10, 2012

HDR Effect?


Do you remember my post about HDR?
Well, since then, I've doing more researching and reading about HDR.
And I've found out how to simulate the HDR look in Lightroom.

I took some photos of beautiful sunsets while on a trip last week,
and I decided to try something.

 You see this photo? The sky is a lovely color. but the waves are so dark...what if I lightened the photo so that the waves are exposed properly...?


Ta da! But look at the poor sky. Washed out. :( So much for that.


But then I remembered something. Lightroom has this awesome tool called "adjustment brush".
You can set exposure, clarity, sharpness, saturation, etc, and then "paint" it on the photo wherever you want it. 

So:
I took the adjustment brush and lowered the exposure just a tad. 
Then I painted over the top quarter of the photo, where the sky is. 
See? It is darker. The photo is way more balanced, and it has an HDRish look to it!


Isn't that awesome!?

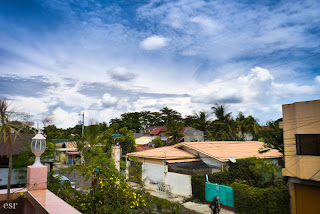
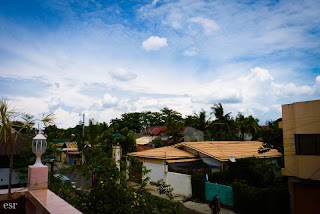
Naturally, I went crazy with it, and had a ball editing these next photos. :D


Those stars made my day :)

Okay, now you go try! It isn't hard. If you don't have Lightroom, don't despair. Look around a bit, and you might find other options. I've heard good things about GIMP, a free photo editing program. 

I'd love to see your edits! 

(Feel free to leave a comment with a link. :))

Mar 27, 2012

HDR: an Experiment

I've been interested in HDR (High Dynamic Range imaging) Photography for a while.
There are some great HDR images out there, and the technique is very unique. 

Here are a few professional HDR images (all link to a post):

by Gavin Phillips
by Leonardo Riano
by Nicholas Moeggenberg
by James Brandon
by MorBCN
After browsing around and reading some tutorials, I decided to give it a try.
I needed 4 things:
  1. A camera
  2. A tripod
  3. A program that did HDR photo merges (Corel PaintShop Photo Pro X3)
  4. Something to photograph
Well, I ended up just photographing my neighborhood. HDR is a more dynamic kind of photography. It shows closer to what the human eye sees, and captures more of the range of colors and light.

In this first photo, the sky is a lovely blue, and the clouds are fluffy and white. But the rest of the neighborhood is a bit underexposed, and the light is kind of "murky" there.


But....voila! In this photo, both the sky and the neighborhood are properly exposed! Cool, right!?


But, you say, HOW in the WORLD did you do that? 

It is actually quite simple.
I set my camera up on the tripod.
I turned the Aperture Priority mode on.
I correctly exposed for the sky.
Then I shot about 7 different exposures.
In some of the photos, the sky is way over exposed, but the neighborhood is lovely.
In others, the neighborhood is way underexposed, but the sky looks great.

Then I took those photos and imported them into Corel PSP, a program that is somewhat like Adobe Photoshop.
I clicked on "HDR Photo Merge" and loaded about 7 photos.
I fiddled with a few settings, and got this photo. Amazing.


(Basically all the program does is merge the images together.)

Here is another HDR photo merge that I have done (in color and black and white):


HDR is used mainly for landscape and cityscape photography. There are great things about HDR, and not so great things. If you look at the clouds in the comparison photos above, the clouds are much clearer in the original photo than in the HDR. That's because clouds move. I took 7 images and merged them together, but the clouds moved slightly in each shot, so they are blurry in the final product.

In my photo, it looks a little weird and unprofessional, but some photographers are very talented at using the moving clouds to their advantage, like in the last example I gave. (by MorBCN)


So, HDR photography is amazing. I enjoyed experimenting with it, and look forward to using it occasionally.
It is definitely not a technique that should be used all the time, but there are a few instances where it can be very well used. Why don't you give it a try?!

Nov 26, 2011

Dance Rehearsal

Well, I promised you earlier that I would post some photos of ballet...so here they are.
I'm afraid that they are not great photos, because the lighting was bad, the dancers were fast, and to be honest, I'm not very good at taking action photography. It is hard. Oh well. It was my first time photographing ballet. :P
 
The performance I saw was a dress rehearsal. There were lots of comments and interruptions by the dance instructors, and it was fun to listen to :D


There were dancers sitting in the wings....people kept telling them to move! 


Little girls in bright costumes.


As I said, it was a dress rehearsal, and there were mistakes and laughing. Very fun to photograph! :D


Her dress reminds me of candy corn for some odd reason!


Cute little girl... the dancers worked so hard, and it was super hot in the auditorium. One of the lead dancers actually fainted during the rehearsal! 


The rehearsal was lots of fun to watch, and there were some good dancers in it!

 
And the end!

Taking photos for this was work. Fun work, but I actually felt exhausted after I finished taking photos. I guess it was late too :)

Have a wonderful weekend!