Showing posts with label shutter speed. Show all posts

Dec 23, 2011

Park Lights

 Earlier this week my family and I went out for dinner and then to a park to walk around and look at Christmas lights. My camera doesn't shoot well in low light situations, so I had to take photos on a slower shutter speed. 
As a result,  many of my photos were blurry from an unsteady hand ;)

But I got some that were good, and it'll give you a little of an idea of what Christmas is like here!


I can't get over how wintry this photo looks.... but seriously, it was like 80 degrees outside. These are the only pine trees I've seen in this city!


Nothin' like a plastic Santa parachuting out of a tree to get you in the Christmas mood! ;P


Well, merry Christmas to all! 

For to us a child is born, to us a son is given, and the government will be on his shoulders. And he will be called Wonderful Counselor, Mighty God, Everlasting Father, Prince of Peace.
Isaiah 9:6 

Dec 14, 2011

Lunar Eclipse

As some of you may (or may not) know, there was a total lunar eclipse 4 days ago, on December 10th. It was in the southern hemisphere, so it wouldn't have been visible to those of you in the US :)
I didn't stay up to watch it all :P
But I got a few neat photos!

8:18pm, 12/10/11, ISO 80, f/2.8, 30.0 sec
 The moon was super bright, as you can see. Well, I took that photo on a long shutter speed, so it wasn't quite that bright. But it was bright, believe me!

8:20pm, 12/10/11, ISO 80, f/3.2, 30.0 sec
 AMAZING stars!
8:28pm, 12/10/11, ISO 80, f/4.4, 1/800 sec
 See, the above photo was taken with a 1/800 sec shutter speed. That's FAST! If you tried to take a photo in normal daylight with that shutter speed, the photo would be super dark.
8:29pm, 12/10/11, ISO 80, f/4.4, 1/500 sec
LOVE IT! :D

 Around an hour later:
9:23pm, 12/10/11, ISO 80, f/4.4, 1/80 sec
Oooh....the eclipse has started....:)
9:24pm, 12/10/11, ISO 80, f/4.4, 1/125 sec
9:25pm, 12/10/11, ISO 80, f/4.0, 1/6 sec
The above photo is pretty awful, but if you look closely, (or click on the photo to make it bigger!) you can see the whole outline of the moon. Amazing, hm?! I took the photo on a slower shutter speed so you can see the whole outline, but the "lit" part of the moon is very bright. 

I had fun :)
Taking photos at night is a challenge, (I NEED A TRIPOD!) but it can be very rewarding.

Sweet Shot Day

Linking up at my3boybarians...Sweet Shot Tuesdays :)

Nov 15, 2011

Windows + Reflectors

I am posting an educational blog post, that (for once!) hopefully will not leave you feeling like your brain has been fried. :P It is just about using a reflector in indoor photography. 

Ever seen those lovely photos that are highly grainy and orange tinted? Taken in low unnatural light inside a house? I have...lots of them.

I've even taken them. Like most people. :) But there are some ways to fix indoor-photography-that-isn't-so-great. 
  1. Use your flash. Try making yourself a diffuser. I posted a little about the one I made HERE. 
  2. Check your white balance. If you set it correctly, it can effectively reduce yellow-orangish lighting.
  3. Shoot at a higher ISO or lower shutter speed to prevent underexposed photos.
  4. Get near those windows! Or a door! They usually provide the best indoor light.
  5. Use a reflector. [This is what my post today is mainly about]
 What? Reflector?
A reflector helps bounce light so that your subject is evenly lit.
Like so:
See how the left side of her face and her hair are all in shadow?
But after strategically placing a reflector beside her, her face is more evenly lit. 
The below photo demonstrates the way I set the reflector up. 
A window on her left and a reflector on her right! Voila. 

Okay... what do you use for a reflector? 
I use that shiny grey thing. I think it is called foam core, but I'm not sure... It works very well though!


When using a reflector, you often need an assistant to hold the reflector while you take the photo. Kind of inconvenient sometimes, but worth it in the end.

Left: without reflector | Right: with reflector
Post #50! Wow! And it's only been 3 months!

Oct 4, 2011

Quarter's End

Well, the first quarter in school is almost up... that means that I am halfway through my photography class.
*sniff*
   
It's been wonderful learning how to take a photo manually... you change anything to make the photo look the way you want it! 
I remember trying to take photos manually just 2 or 3 months ago... I got so frustrated because I understood almost nothing about changing the settings, and all my photos turned out blurry, or dark, or overexposed... It was kind of sad, and I was discouraged.
But after just 2 months of studying and working to "get it," I can finally take photos manually. (and understand what I'm doing. That has been one of the most rewarding things in my class so far.

 I'd like to mention this resource:
click button to visit...
This series has been a huge help to me so far! The author, Darcy, writes so clearly and explains everything very well. (Her photography is also amazing!) I highly recommend this for beginner photographers. Or any photographer for that matter. :D I now understand aperture, ISO, shutter speed, white balance, and histograms thanks to this website!
31 Days to a Better Photo has been my "textbook" for this course. I've basically gone through two posts each week, and done projects and photography that correspond with the concepts I learned from reading the posts.

There were 3 settings that I learned about that really helped me to understand photography. Aperture, shutter speed, and ISO. If you study anything about photography, study those 3 concepts. They are really useful. And essential if you want to get a good photo! 

Aug 25, 2011

Shutter Speed Applied 2

Okay, I have to say that this project was hard. I was originally assigned to go out on a street and photograph moving lights at night. But I was having a hard time finding a busy road to photograph... in fact, I was having a hard time finding any moving lights to photograph. *sigh* 

It turned into a project that included a stationary candle and a moving camera.


Heh.
Yeah.
Think you have eye problems? Fear not, O friend. 

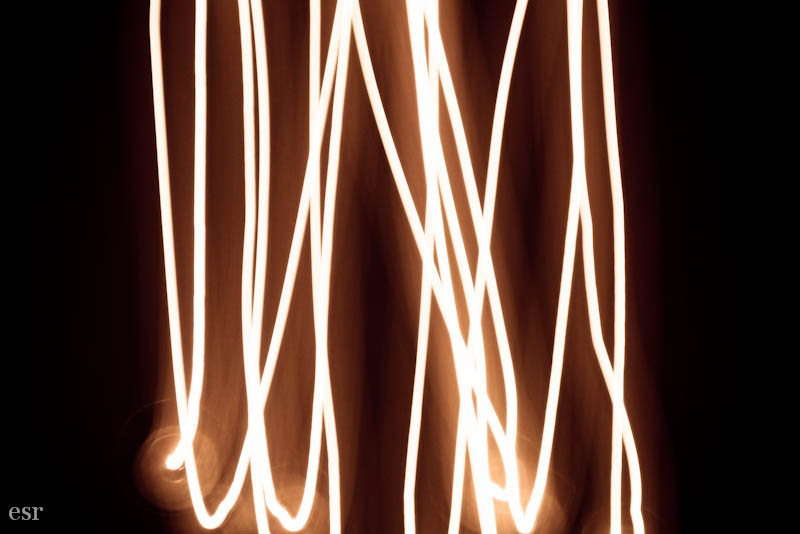
For all of these photos, the shutter speed was set at 15 seconds. 
That means the shutter was open for 15 seconds. You can get ALOT of light into a camera when you leave the shutter open for 15 seconds. That makes it pretty much essential to shoot in a dark place when you have the shutter open that long.

The above photo was taken by waving the camera wildly around. All the streaks of light are from the candle...


Here I just moved the camera up and down to make kind of a stripey pattern.
You can actually see the candle in the bottom left-hand corner. (Along with my beautiful watermark :D Not that any of you nice people would want to steal MY photos!)


This one.
Hm.
I really don't remember what I was doing here. 
Looks cool anyways.


And for the grand finale, a rather lopsided heart.
Yep, that blob is supposed to be a heart. 

So for now, the lessons to be learned are:
  1. You can make cool patterns with a candle (or flashlight even) if you leave your shutter open a long time.
  2. But, you must be in a dark room when you do that, because if you are shooting in a well-lit place, your photo will turn out a big, white, over-exposed blur. Try it sometime.
  3. After seeing my photos, you know you really can't do too much worse than me on this. Do try it sometime. 
  4. It isn't quite pointless either. 
Note: If you are using on a point&shoot, you can turn your camera on "starry night" mode, under "scene." I think most cameras have that... it might be called something a bit different. 

If you have a nicer-than-point&shoot-camera, well..........LUCKY! You can shoot on shutter priority (where you can set the speed of the shutter to whatever you want.) Usually on a nicer camera you could find some kind of mode for shooting starry skies that would have long shutter speeds. 

Have fun. And if you are using a candle, try not to burn your poor house down. 

;)

Aug 18, 2011

Shutter Speed Applied


Well.
I must break the news now.
I really. Really. REALLY. REAAAALY. Need to work on my photography.
*sigh* 

Below are some photos I took while experimenting with shutter speed. No, they aren't great. Mostly due to the fact that my subjects were not beautiful in themselves, and the lighting was AWFUL in the second set of photos.  I was a stickler and kept the flash off the whole time. Except once. I closed it again right away.

Anyway. I learned alot.
Primarily, that the longer you leave the shutter open, the more blurry the photo is. 
Or in more technical terms, the slower your shutter-speed, the more action you can see in the photo. 
Hm.


First example:
The fan.
 (Don't laugh. It was one of the only objects that moved fast enough.)


ISO 80
(Aperture) F/7.1
(Shutter speed) 1/2 sec 

Take a look at this photo. See inside the fan, that blue blur? Yes, that's the blade. 
My shutter was open for half a second, (That's a long time, in photography.)
And you can tell that the fan is on. 
Cool.
Neeexxxt.


ISO 1600
(Aperture) F/3.6
(Shutter speed) 1/125 sec 

Okay. Check THIS one out. You can actually see the blades. 
My shutter was open for one one-twenty-fifth of a second here (sort of fast in photography.) 
If the room had been brighter, I could have made the shutter speed even faster so you could see the individual fan blades. 

(Note for next time: brighter room)

And the two photos closer to see the difference...


Second example:
The Ribbons that I Tied to the Lamp and Turned a Fan on Them so that They Would Move.
Please don't laugh here either.


ISO 80
(Aperture) F/6.3
(Shutter speed) 1/3 sec 

My shutter was open for one-third of a second for this photo. It is very interesting to see them moving like that...


ISO 1600
(Aperture) F/4.0
(Shutter speed) 1/160 sec

And the shutter speed for this one was one one-sixtieth of a second. For the most part, the ribbons are in focus. The ends are a bit blurry...

And together.


Well, I learned alot, if nothing else. No keeper photos there. 

And thanks for not laughing until now.
I give you permission to laugh.