place points of focus at thirds rather than center, center on the x- and y-axis
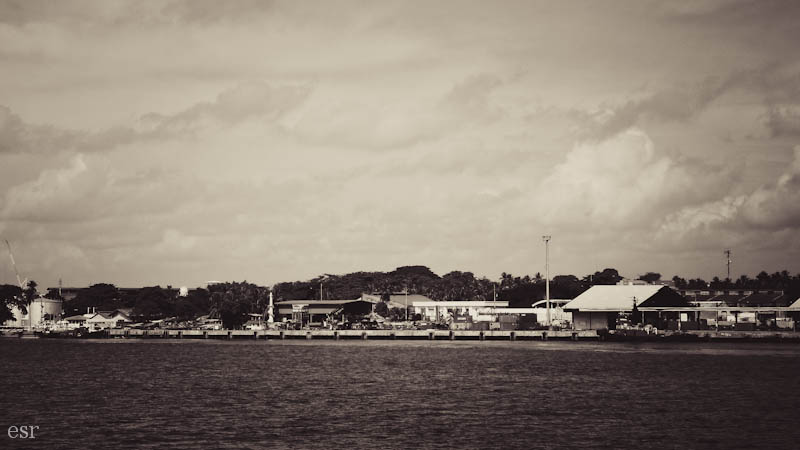
This photo demonstrates the Rule of Thirds element pretty well.
I placed the point of focus (the shoreline) two-thirds of the way down the photo, instead of smack in the center. It's not always the way to take a photo, but sometimes it gives a great effect!
P.S. I know the quality of the above photo is pretty bad...but I couldn't put a grid on it in my photo editing program so I had to do it in my graphic editing program. That made the photo awfully grainy. Apologies. *sniff*
My goal is to take (or hunt in my photo archive for) one or two photos that illustrate each of the nine elements :)
The first one is:
Filling Your Frame
The first photo is probably a better illustration of this element, but both work. I think the key is getting your frame filled with something, and have the majority, if not all of it in focus.
Here are the Bible Dedication photos I promised you :)
Our internet is finally working again, so I can resume blogging photos. (Yay!)
We had to get up at 4:30 to take the bus to the area where the dedication was to take place. I took some photos during the bus ride, but I'll just show you the actual dedication photos for now. I figured 24 photos was enough to give you for the moment ;)
There were many different speakers, most in traditional costume.
Lots of cameras there, including some pretty serious looking ones. :D
My family asked if I pasted these three faces together, but no, it is one photo!
There were TONS of people there... I'm guessing well over 1000. Old people....
...and young people!
Amazing dancing combined with cultural music, costumes, and themes.
Each person received a traditional necklace, and they were available to buy...aren't they gorgeous? Not that I'd be brave enough to wear one ;)
I saw this girl pointing her camera at me...(not an uncommon occurrence as a white foreigner) so I decided to take her photo taking my photo. Evidently the girl behind thought it was hilarious. :D
There was reading from the newly translated Bible...
...and thoughtful listening. (or boredom?!)
Adorable little girls!
Many of the people who had worked on the translation were honored.
Another adorable little girl :) (Look at those eyelashes!)
More dancing :)
Dedicating the New Testament in their heart language.
I was sneakily taking a photo of these girls, and they saw me. So I obliged and took a posed one of them. Then the girl in yellow whipped out her cellphone and handed to the girl in
blue. The first girl came over and sat by me and the girl in blue took a
photo of us together. Then the girl in yellow took the phone and the girl
in blue had her photo taken with me. I seriously felt like Cinderella at
Disneyland having photos taken with excited kids!
Great shirt! :)
Our lunch!
While everyone was buying Bibles and eating lunch, this little boy hopped up on stage and started playing the drums with his hands :D
Awww....
My dad and brother "hanging out" ;)
Reading the Word
I love getting photos like this!
What a great costume...this woman worked so hard and so long on the project. It must have been a wonderful day for her; seeing the Bible finished at last!
I'm so thankful for the opportunity to attend Bible dedications...Not many people have the chance to experience something like this!
Apologies for not posting for a few days... Our internet has been slow and uncooperative, and I'm having a hard time uploading photos. :(
Hopefully it will be back in the next day or so and I will post some he photos I've taken this weekend at a dress rehearsal for a ballet and at a New Testament Dedication! :)
Have a lovely day. Hope your internet is working better than mine :P
Will return with photos soon...
P.S. I also apologize for the state of my blog design right now. I know I don't have a header... I'm working on a few new things and hoping the internet will speed up soon...
Whew. Yes, I've been learning a bit about flash lately. It still isn't my best friend. All the reflected light it leaves...bleh. But the diffuser helped. I just wrapped a long piece of vellum (thin, partly transparent paper) around the built in flash and taped it.
I took mostly in black and white, because I like the feel the flash gives it ;)
I started in the computer room...
The wire and connector holder
Pencils...and mugs...
Hellloooo there....... *note to self* Clean mirror
Then I went out to the deck.
A plant. Duh.
The balcony of our deck is quite interesting, doncha think?
The little ball at the end of a wind chime. You can see the flash in it ;)
And lastly, a shell.
Verdict: Flash when I need it, but not if I can help it. Unless I come up with a better idea for a diffuser...
:P
Any ideas?
P.S. There is a little bit of a blog redesign in progress....excuse the lack of header and other interesting differences right now ;)
Something like this....................or more like this?
Or something nicer? Maybe you don't even own your own camera.(borrowing is a great deal ;) )
Whatever you use, I have some encouragement, (and a challenge) for you.
You don't need a big, heavy, and super-nice professional camera to take good photos.
Yep.
That's what I said.
You can take great photos, even amazing photos, with a point and shoot.
SOOC | From my point and shoot camera
It isn't what you hold up to your eye that counts, it's what you capture that counts.
Photography is art. And art comes in all different shapes, sizes, forms and colors. Don't be discouraged if you don't have your dream camera.
I should point out, too, that a nice camera does not make a good photographer. You could give a really nice camera to someone who isn't a photographer, and still get some pretty bad photos. You could also give a professional photographer a really awful camera, and that person would produce some wonderful images despite the quality of the camera.
Are you getting it? It doesn't always take great equipment to take great photos. Sure, it helps. I won't go as far as to say that it doesn't matter what you use. But for the most part, it is what you do with the camera that makes or breaks the photo.
The right equipment for you might not be the most expensive stuff on the market.
You can outgrow a camera. If you've learned pretty much everything you can on that camera, and you find yourself wanting to take you photography a step further, maybe it is time to start thinking about getting a new camera.
"The right tool will not make the photographer,
it will simply make the right photographer more effective." from 31 Days to a Better Photo
The hardest thing for me in all this is learning to be content with what I have. I look at photos that some people take, and I see their huge, heavy cameras, and I think, wow, I wish I had a camera like that. I bet I would be so much better at photography if I could just use a nicer camera!
But then I have to stop and remember that I am learning so much still. I really do have a great camera, and an working to get some good photos out of it. Read more about my camera here...
I hope that was encouraging... go take a few photos!
Keep your lives free from the love of money and be content with what you have, because God has said, "Never will I leave you; never will I forsake you." Hebrews 13:5
An image histogram is a type of histogram that acts as a graphical representation of the tonal distribution in a digital image. It plots the number of pixels for each tonal value. By looking at the histogram for a specific image a viewer will be able to judge the entire tonal distribution at a glance.
Blah, blah, blah. ;)
In English, an image histogram is a graph that shows you all the different shades in an image from pure white to all black. So histograms differ depending on the photo.
(p.s.: Usually you can find a setting in your camera's menu that says "histogram." Just turn that setting on to see a histogram when shooting! Refer to your manual if you need help...)
Okay, now you know what a histogram is.
But how does it work?
Take a look at this photo:
(yep, same one I posted yesterday :) )
See that there is quite a range of tones in this photo, from the almost white sun, to the dark shadows in the bottom half of the photo.
In a histogram the edges are the most important part.
Okay. The left side of this histogram represents the darker places in the photo. And the right side represents the light spots.
Keeping that in mind, look at the far left side of the histogram. See that grey strip running up the side? That represents the dark places in the photo, which are also the blue shaded places in the below photo.
There the histogram is showing you those places are completely black. You can't "retrieve" them, or lighten them up, even in a good editing program because the camera just captured pure black.
This is what would happen if you tried to lighten those places up:
If you look closely, you can see areas that are just plain black. They aren't retrievable...you can't lighten them to see more detail.
And same with the white parts of the photo:
The white parts of the photo are shaded red... it's just the sun in this photo. But I can't darken the photo to be able to see the round shape of the sun, or see more shadows.
It can't darken the part that is completely white, because the camera didn't capture any detail there but plain white!
On the right side of the histogram you can see a little grey going up the side of the histogram. That represents the white part, the sun in the above photo.
Now, in the sunrise photo, (the good one, the first photo I posted) it was okay for me to have "irretrievable" places that were completely light or completely dark. I liked the photo that way... I didn't need to lighten or darken those places.
But in a photo like this...
Poor flower :(
it's NOT good!
You don't want a lovely orange flower overexposed to the point of being white. You won't be able to fix it, even in a fancy editing program.
When I try to darken it this is what happens:
Poor, poor flower :'(
Now, not all photos are as drastic as this. There may be a time when you are taking photos, and they look fine on your camera, but then you look at them on the computer, and you realize that there were places that were way too dark or too light. That is when the histogram comes in handy. You can read it and see quickly if places are too dark or light
(for the 1st flower photo)
As I quoted before, the edges are the most important part. If you have strips (aka pixels) running up the left side, you know some places are irretrievably dark, and if you have pixels running up right side, you know some places are irretrievably light.
So watch your histograms, friends!
:)
*if you read this whole thing without getting confused, brownie points to you!